When it comes to outdoor fun and adventure, few things can beat the thrill of ziplining. While many people associate ziplining with professional courses and exotic destinations, you can actually bring this exciting activity right into your own backyard. In this article, we will explore seven zipline platforms you can build for backyard fun, from classic setups to innovative designs, ensuring there’s an option to suit your needs and space.
Additionally, we’ve included product recommendations to help you find the best equipment for a safe and exciting zipline experience.

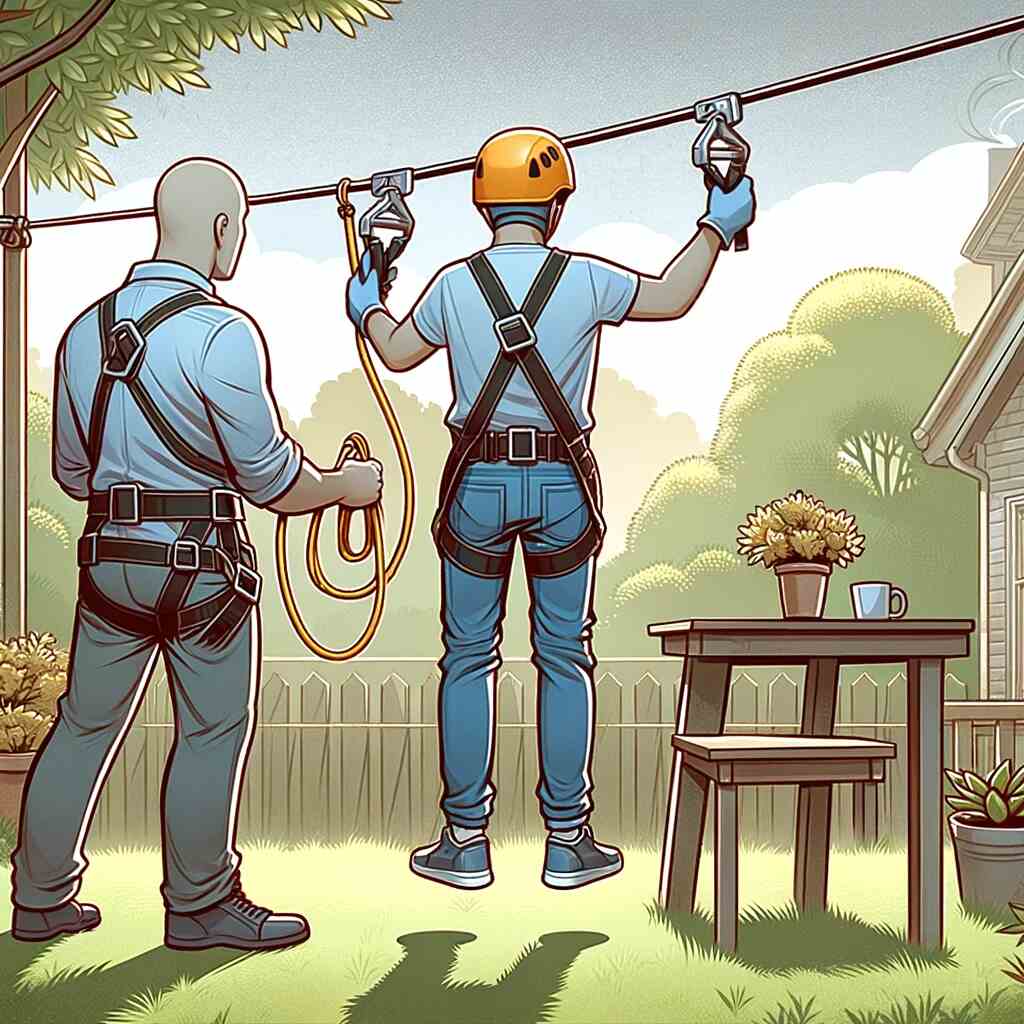
1. Classic Zipline
The classic zipline is the most common type of zipline setup, perfect for those who want to experience the thrill of gliding through the air. To build a classic zipline platform in your backyard, you’ll need the following materials:
- A sturdy zipline cable (galvanized steel or aircraft cable is ideal)
- Two strong anchor points (trees, poles, or custom-built supports)
- Zipline trolley or pulley
- Harness and helmet for safety
- Carabiners, quickdraws, and other hardware for attachment
Here’s how you can set up a classic zipline platform:
- Identify two suitable anchor points in your backyard, ensuring they are sturdy and at a proper distance apart. Trees with a minimum diameter of 12 inches work well, but you can also use posts anchored in concrete.
- Install a cable tensioning system using turnbuckles to keep the zipline cable taut. The cable should slope downward slightly from the starting point to the ending point to ensure a smooth ride.
- Attach the zipline trolley or pulley to the cable, making sure it can hold your weight and has a braking system in place.
- Put on your harness and helmet, and securely attach yourself to the zipline trolley using carabiners and quickdraws.
- Take a deep breath, step off the platform, and enjoy the ride!
Ensure you follow all safety guidelines, and always double-check the integrity of your setup before each use. This classic zipline platform offers endless hours of outdoor fun for both kids and adults.
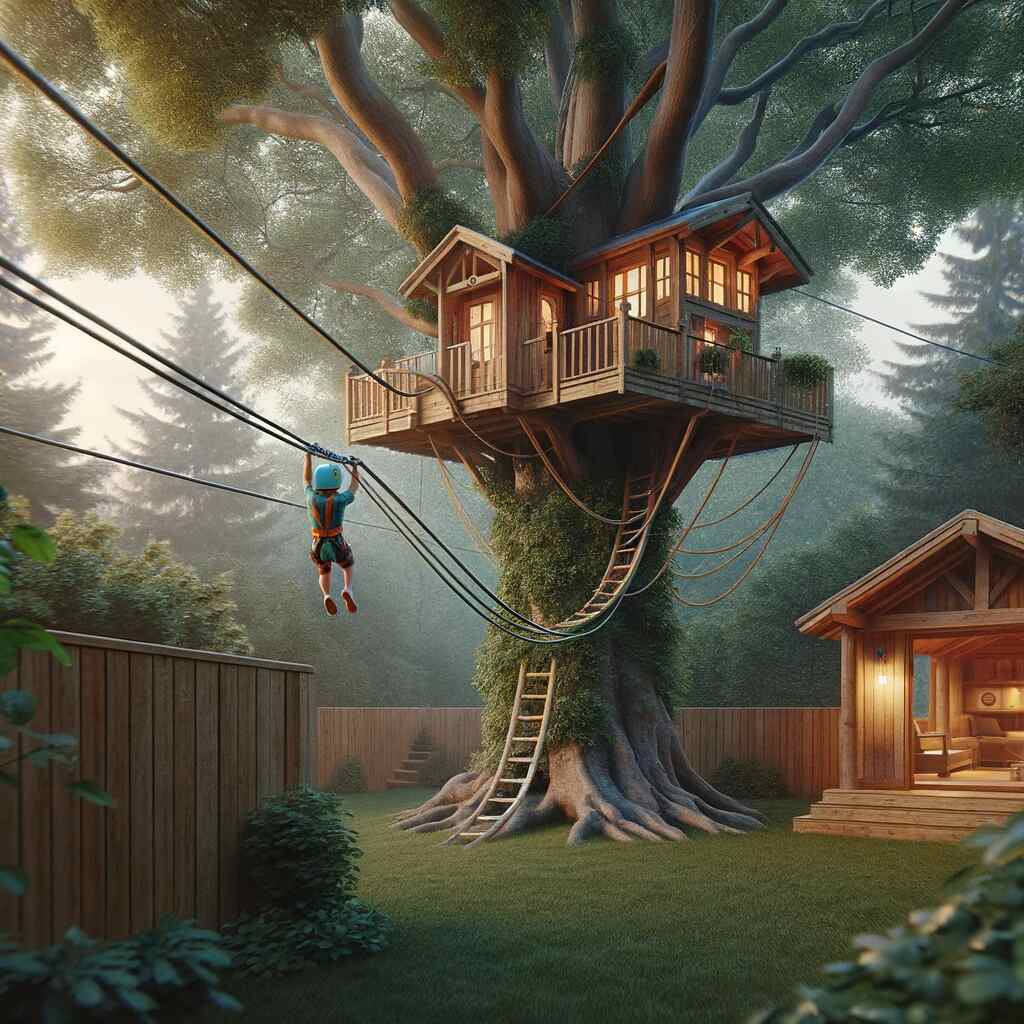
2. Treehouse Zipline
Combining the excitement of a zipline with the charm of a treehouse is a dream come true for many children (and adults). Building a treehouse zipline can create an enchanting backyard adventure for your family. Here’s how to get started:
Materials Needed:
- A sturdy zipline cable
- Two strong anchor points (trees or custom-built treehouse supports)
- Zipline trolley or pulley
- Harness and helmet for safety
- Carabiners, quickdraws, and other hardware for attachment
- Treehouse platform with ladder or stairs
Steps to Build:
- Begin by constructing or locating a suitable treehouse in your backyard. Make sure it’s safely built and securely anchored to the trees.
- Identify two sturdy trees that are close enough together for your zipline cable to span between them. The trees should be able to support both the treehouse and the weight of zipliners.
- Install a cable tensioning system between the two trees, ensuring the cable slopes downward slightly for a smooth ride.
- Attach the zipline trolley or pulley to the cable, equipped with a braking system for safety.
- Put on your harness and helmet, secure yourself to the zipline trolley, and glide from your treehouse to another part of your backyard.
A treehouse zipline adds an element of adventure to your outdoor space, encouraging kids to explore and appreciate nature. Make sure to follow safety guidelines and maintain the treehouse and zipline regularly.
3. Backyard Zipline Park
For those with more extensive outdoor spaces and a passion for ziplining, consider creating a backyard zipline park. This setup can accommodate multiple ziplines of varying lengths and difficulty levels, providing endless entertainment for family gatherings and parties.
Materials Needed:
- Multiple sturdy zipline cables
- Multiple strong anchor points (trees or custom-built supports)
- Zipline trolleys or pulleys for each line
- Harnesses and helmets for safety
- Carabiners, quickdraws, and other hardware for attachment
- Platforms or treehouses at various heights
Steps to Build:
- Plan the layout of your zipline park, considering the terrain and available space in your backyard.
- Identify suitable anchor points for each zipline cable and install the cables with the necessary tensioning systems.
- Build platforms or treehouses at different heights to serve as starting points for your ziplines. Ensure they are secure and have ladders or stairs for easy access.
- Attach zipline trolleys or pulleys to each cable, equipped with braking systems for safety.
- Outfit zipliners with harnesses and helmets, ensuring they follow safety protocols before riding the ziplines.
- Create a variety of ziplines with different lengths and heights, catering to various skill levels and age groups.
- Invite friends and family to your backyard zipline park for hours of fun and adventure.
A backyard zipline park offers an exciting and dynamic experience for both kids and adults. Safety remains paramount, so regularly inspect and maintain your ziplines, platforms, and equipment.
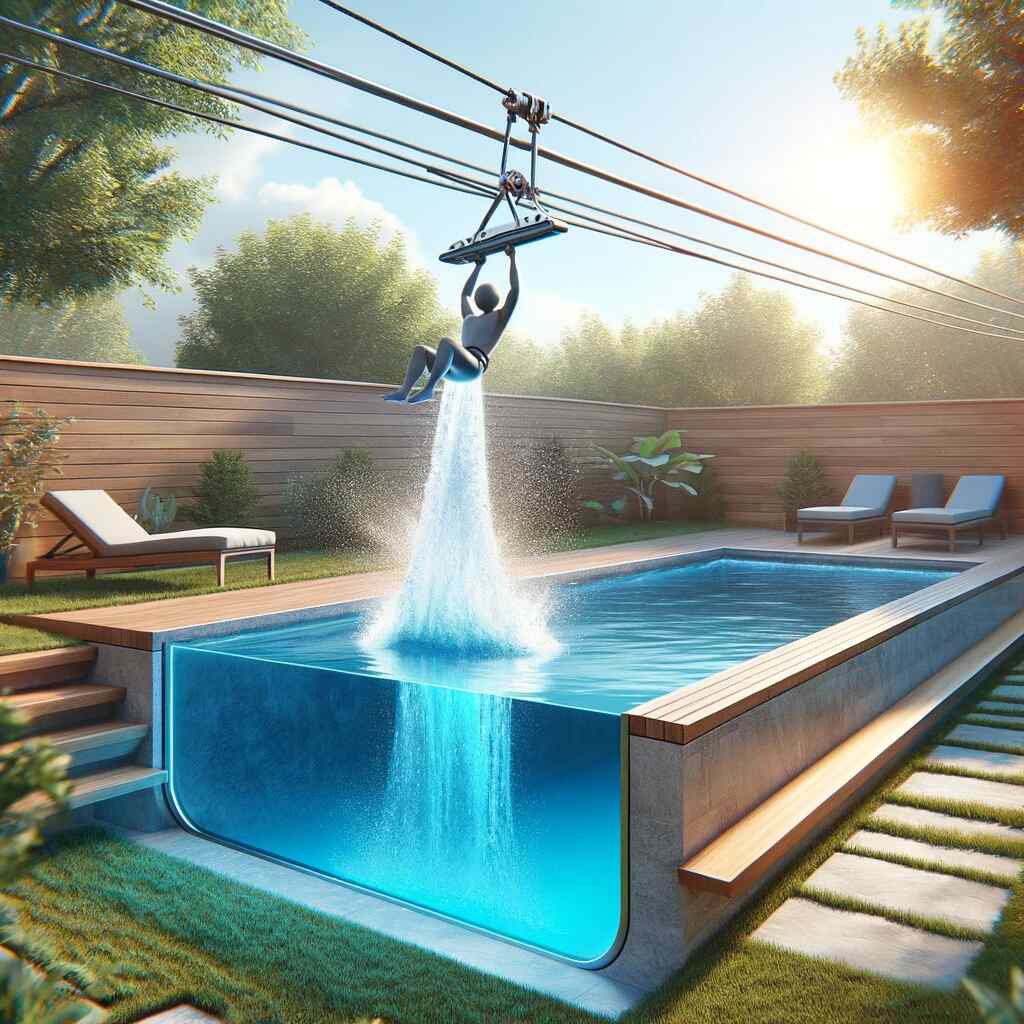
4. Zipline with a Landing Pool
To add a refreshing twist to your zipline adventure, consider incorporating a landing pool into your backyard setup. This type of zipline platform combines the thrill of ziplining with the joy of splashing into a pool on a hot summer day.
Materials Needed:
- A zipline cable with proper tensioning
- Two strong anchor points (trees or custom-built supports)
- Zipline trolley or pulley
- Harness and helmet for safety
- Carabiners, quickdraws, and other hardware for attachment
- Inflatable pool or water-filled landing area
- Proper water safety measures
Steps to Build:
- Set up a zipline cable between two sturdy anchor points in your backyard, ensuring the cable slopes downward for a smooth ride.
- Attach the zipline trolley or pulley to the cable, equipped with a braking system for safety.
- Place an inflatable pool or create a water-filled landing area at the end of the zipline.
- Put on your harness and helmet, secure yourself to the zipline trolley, and enjoy the ride as you glide into the refreshing pool or landing area.
- Implement proper water safety measures, especially if children will be using the zipline and landing pool.
A zipline with a landing pool adds a playful and thrilling element to your backyard. It’s a fantastic way to beat the summer heat and keep the fun going all season long.
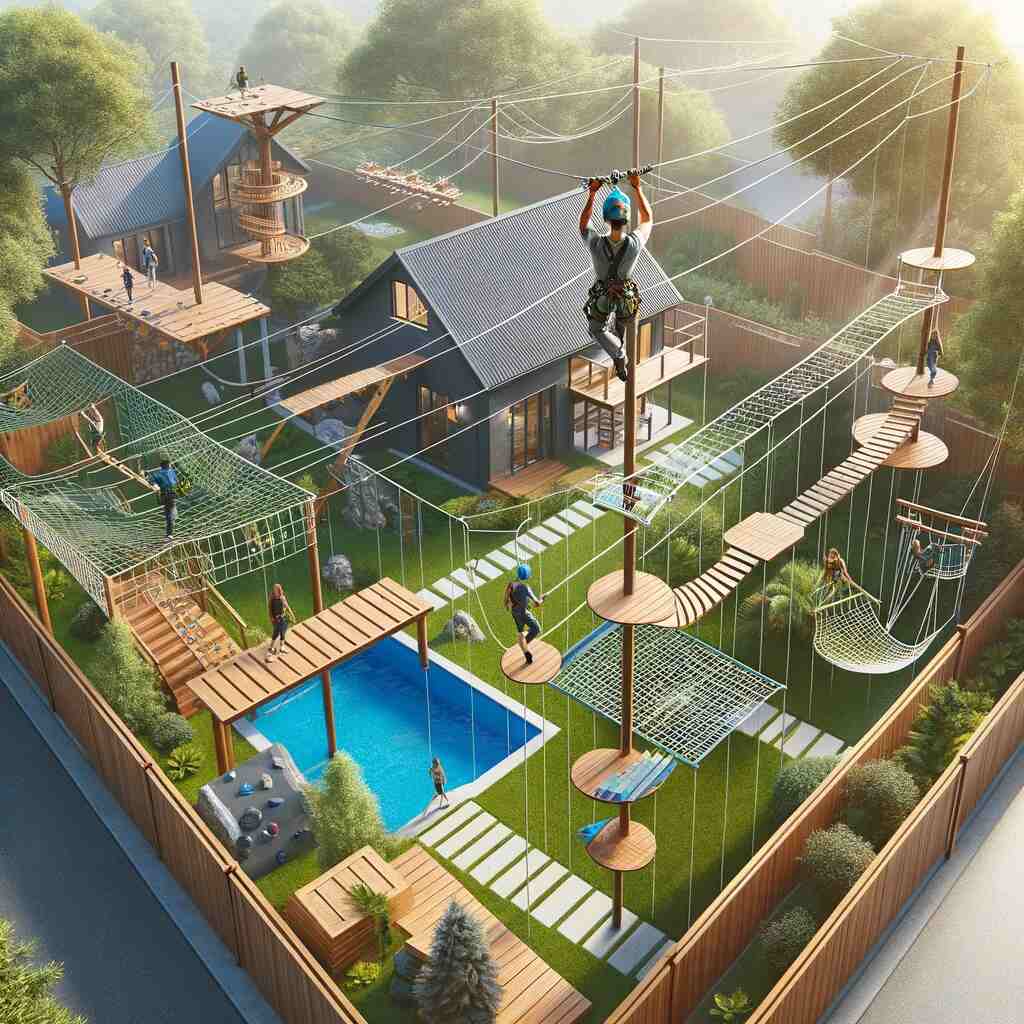
5. Zipline and Adventure Course
For those looking to create an ultimate backyard adventure, combining a zipline with an adventure course is an exciting option. This setup allows you to challenge yourself and test your agility while ziplining from one obstacle to another.
Materials Needed:
- A zipline cable with proper tensioning
- Two strong anchor points (trees or custom-built supports)
- Zipline trolley or pulley
- Harness and helmet for safety
- Carabiners, quickdraws, and other hardware for attachment
- Obstacle course elements (rope bridges, cargo nets, climbing walls, etc.)
- Safety netting or padding for falls
Steps to Build:
- Set up a zipline cable between two sturdy anchor points in your backyard, ensuring it slopes downward for a smooth ride.
- Attach the zipline trolley or pulley to the cable, equipped with a braking system for safety.
- Design and install various adventure course elements in your backyard, such as rope bridges, cargo nets, and climbing walls. These elements should be strategically placed between ziplines, creating a challenging path.
- Put on your harness and helmet, secure yourself to the zipline trolley, and navigate the adventure course while ziplining.
- Ensure you have safety netting or padding in place to protect against falls and injuries.
A zipline and adventure course combo provides an incredible blend of excitement and physical activity. It’s an excellent choice for thrill-seekers and those who enjoy pushing their limits.
6. Elevated Zipline
If you want to add an element of height to your zipline experience, consider building an elevated zipline platform. This type of setup allows you to start your zipline adventure from a higher point, providing a more dramatic descent.
Materials Needed:
- A zipline cable with proper tensioning
- Elevated starting platform (treehouse, tower, or custom structure)
- Zipline trolley or pulley
- Harness and helmet for safety
- Carabiners, quickdraws, and other hardware for attachment
Steps to Build:
- Construct an elevated starting platform in your backyard. You can choose to build a treehouse, a tower, or a custom structure. Ensure it is securely anchored and provides a stable starting point for your zipline adventure.
- Set up a zipline cable between the elevated starting platform and a suitable anchor point on the ground, ensuring proper tensioning and a downward slope.
- Attach the zipline trolley or pulley to the cable, equipped with a braking system for safety.
- Put on your harness and helmet, secure yourself to the zipline trolley, and experience the thrill of a high-flying descent.
An elevated zipline offers an adrenaline rush and breathtaking views that you can’t get with a ground-level zipline. Be sure to prioritize safety by following all guidelines and conducting regular maintenance.

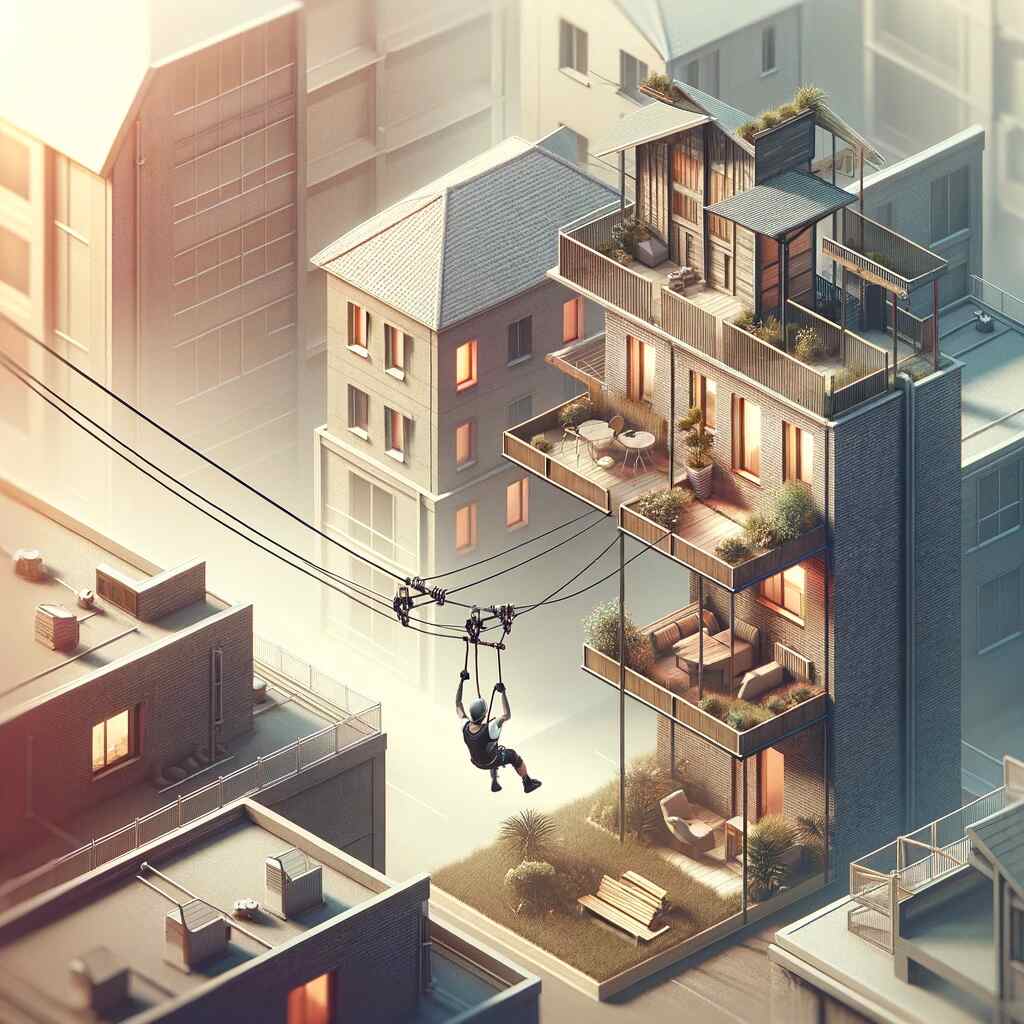
7. Urban Zipline
If you’re in an urban or suburban environment without access to trees or open spaces, you can still enjoy the excitement of ziplining by building an urban zipline platform. This setup is designed to fit within a smaller backyard or even on a rooftop.
Materials Needed:
- A zipline cable with proper tensioning
- Custom-built support structure (steel frame or similar)
- Zipline trolley or pulley
- Harness and helmet for safety
- Carabiners, quickdraws, and other hardware for attachment
Steps to Build:
- Create a custom support structure to serve as the starting and ending points for your urban zipline. This structure should be securely anchored to the ground or the rooftop.
- Set up a zipline cable between the two points, ensuring proper tensioning and a safe slope.
- Attach the zipline trolley or pulley to the cable, equipped with a braking system for safety.
- Put on your harness and helmet, secure yourself to the zipline trolley, and experience the thrill of urban ziplining.
An urban zipline provides an exciting adventure for those with limited outdoor space. Ensure that your support structure is built to withstand the stress of ziplining and that all safety precautions are followed.
Recommended Products to Buy for Backyard Zipline Fun
When setting up a backyard zipline, having the right equipment is crucial for safety and enjoyment. Here are some highly recommended products to help you get started:
Zipline Cable Kits
- Slackers Zipline Falcon Series Kit – This complete zipline kit includes a 100-foot stainless steel cable, a durable steel trolley, and a bungee brake for a smooth ride. Buy on Amazon
- CTSC 95 Foot Zipline Kit – Featuring a 95-foot galvanized steel cable, trolley with rubber grips, and a seat for comfort. Buy on Amazon
Zipline Trolleys and Pulleys
- Riderz Zipline Trolley – A heavy-duty, easy-to-install trolley with smooth bearings for a fast and fun ride. Buy on Amazon
- Zixar Zipline Pulley – Durable and lightweight, this pulley ensures a smooth glide along the zipline cable. Buy on Amazon
Harness and Helmet Sets
- PETZL CORAX Climbing Harness – Adjustable and comfortable, ideal for ziplining and other adventure sports. Buy on Amazon
- Black Diamond Half Dome Helmet – Offers excellent protection and a secure fit for all your ziplining adventures. Buy on Amazon
Carabiners and Quickdraws
- Black Diamond Positron Screwgate Carabiner – Reliable and sturdy, perfect for securing yourself to the zipline trolley. Buy on Amazon
- PETZL Djinn Axess Quickdraw – A strong and versatile quickdraw set for various attachment needs. Buy on Amazon
Cable Tensioning Systems
- Turnbuckles for Cable Tensioning – Essential for keeping your zipline cable taut and safe. Buy on Amazon
Inflatable Pools for Landing Pools
- Intex Easy Set Pool – A great option for creating a fun and refreshing landing area for your zipline. Buy on Amazon
Treehouse Platforms
- Treehouse Attachment Hardware Kit – Everything you need to build a sturdy and safe treehouse platform for your zipline. Buy on Amazon
These recommended products are selected for their quality, durability, and safety features to ensure you have an enjoyable and secure ziplining experience in your backyard.
Zipline Safety Tips
No matter which type of zipline platform you choose to build in your backyard, safety should always be a top priority. Here are some essential zipline safety tips to keep in mind:
- Inspect Regularly: Check your zipline cables, hardware, and support structures regularly for signs of wear and tear. Replace any damaged components immediately.
- Use Safety Gear: Always wear a harness and helmet when ziplining. Ensure that your harness is properly fitted and secured.
- Follow Weight Limits: Pay attention to weight limits specified by the zipline equipment manufacturer. Exceeding these limits can lead to accidents.
- Practice Safe Riding: Make sure you understand how to use the zipline trolley or pulley and how to control your speed. Use proper hand placement on the cable to steer and brake.
- Supervise Children: If children are using the zipline, ensure they are supervised at all times. Teach them zipline safety rules and procedures.
- Secure Loose Clothing: Before ziplining, secure any loose clothing, accessories, or items that could get caught in the zipline or pulley.
- Stay Hydrated: When using a zipline with a landing pool or during hot weather, stay hydrated to prevent heat-related issues.
- Maintain Clear Landing Areas: Keep the landing area clear of obstacles and debris to ensure a safe landing.
- Educate Guests: If you have guests using your zipline, provide them with a safety briefing and ensure they understand the rules.
- Adhere to Local Regulations: Check if there are any local regulations or permits required for building and using a zipline in your area.
By following these safety guidelines, you can create a backyard zipline platform that offers thrilling adventures while minimizing the risk of accidents.
Conclusion
Building a zipline platform in your backyard is a fantastic way to introduce excitement and adventure into your outdoor space. Whether you prefer a classic zipline, a treehouse zipline, or a more elaborate zipline park, there are options to suit various preferences and space constraints.
Remember that safety should always be your top priority when building and using a zipline. Regular maintenance and adherence to safety guidelines will ensure that your zipline platform provides endless fun and lasting memories for you, your family, and your friends. So, choose the type of zipline platform that suits your backyard and embark on your backyard ziplining adventure today!


